 If you apply the same simple style sheet to each of your pages, later on, you can make formatting changes to your entire site by just making a few changes to the style sheet. I would recommend doing it.
You can skip this step completely, but if you follow it, it will be easier to modify your site later on, when you have a bit more experience.
 If you apply the same simple style sheet to each of your pages, later on, you can make formatting changes to your entire site by just making a few changes to the style sheet. I would recommend doing it.
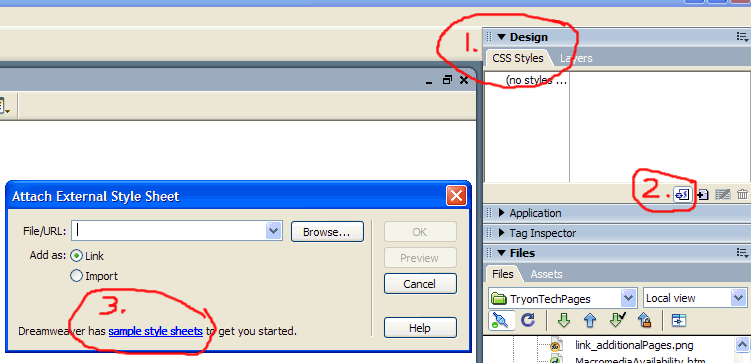
Open your index page again (if you have closed it) and from the Design tab (1), click on the Attach External Style Sheet icon (2) and then click on the sample style sheets link (3).
Scroll through the list and pick something basic, such as Text:Verdana and click OK. This will copy the style and save it as a file in a folder named CSS in your site folder. You might wish to re-name this to something like basicStyle_lastname. It will put .css on the name as its extension. (To re-name, right-click or ctrl-click on the file name and options appear, including many under Edit. If you rename it here, it will update all of the links in your pages automatically.)
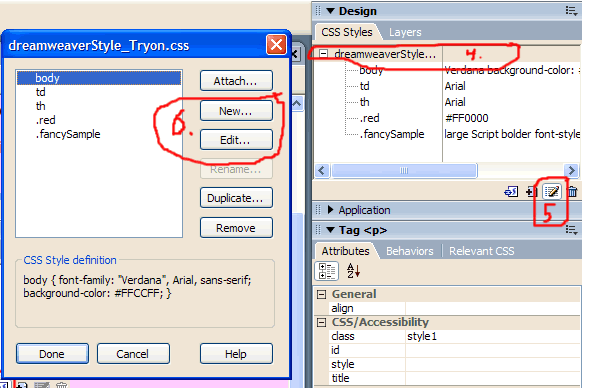
 Now when you make a change to your document, the formatting will be saved in your style and will be available in all of your documents where you apply this style sheet. For instance, select your style name (4) and click on the Edit icon (5). You can then create a new style or edit an existing one (6). this opens up the style sheet and allows you to change what you want. When you save the style sheet, this new style will show up in the selections listed under Style in the Properties window at the bottom of the sheet. This style will now show up in the Style selections at the bottom of the page (and in other pages using this style sheet.)
Back - Dreamweaver - Post your first page
Next - Folder naming conventions